ChromeOS Client Deployment
As of 7.8 there is an agent application for ChromeOS computers. This allows for integration with the inventory capabilities of the Google dashboard with the addition of offline usage tracking for Chrome Apps.
Overview
Chromebooks are capable and cost-effective mobile computers that provide a simplified user experience and fit well within today’s always-connected computing environment. They are designed to look and work differently from typical desktop and laptop computers running Windows, macOS, or Linux. The KeyServer Platform client for Chromebooks has been purpose-built for this new class of devices, so while it provides the same core functionality as our desktop client, there are some notable differences.
Just like the client on other OS's, the goal of the client is to automate collection of as much data as possible. This data starts with basic hardware properties. One key requirement is that the Chrome device is managed by the Google Chrome Management Console. Without this condition, we cannot programmatically determine the serial number of a device - and this serial number is necessary to uniquely identify the device within the KeyServer Platform.
The KeyAccess client on Chrome will attempt to gathers many hardware properties as possible - such as Computer Name, MAC address, total RAM, Display dimensions, Manufacturer, and Model. Note however - the device name is determined by the Management Console and will often simply reflect the Serial Number. While an API exists to ask for Manufacturer and Model, our testing has shown that it never returns a value, so these will be blank. In order to augment hardware properties for ChromeOS, you can use a javascript that queries the Google Chrome Management Console via REST apis. We have found that this will fill in the values for Manufacturer and Model, among other data that might only be available using this approach.
Next, the ChromeOS client will gather a list of installed applications/extensions. A "program" record is created for each extension, just like it is created for an executable on other platforms. Whereas a Windows computer will have hundreds or even thousands of executables installed, a Chromebook more likely has less than one hundred extensions installed. Just like on any OS, we can actively gather this view of what is installed, and keep it up to date.
KeyAccess reports information about usage of the computer itself. On ChromeOS, we record an event if a user logs in, but the exact details and duration of the session are not closely monitored, since a user is likely to stay logged in for long periods of time, simply closing and opening the laptop. So, reporting can show a list of users who have been logged into a certain device within a time range, but without a total duration.
Finally, usage of applications can be reported. Although we can see that an extension is installed, we cannot see usage when it is purely javascript executing. However, many Chrome extensions are built primarily around access to web pages - and we can see URL access. So whenever an extension is built primarily around an online service or portal, and the URL is well defined, we can gather usage (whether or not an extension is installed). But when an extension is implemented primarily as javascript or other local execution, we will not be able to monitor usage. Because of the networking available to our client on ChromeOS, all usage is reported asynchronously, after the fact. So, you will not be able to see a view of current users of a Chrome application, but you will be able to summarize usage on Chrome e.g. for "last week".
Setup Steps
Note that KeyServer 7.8 or higher is REQUIRED for a ChromeOS agent to connect to the server.
You will need three values. The first is the Chrome extension ID of the "KeyServer Client for Chromebook”:
fpcdclafcckdpagpkcbilmedeiehjehb
The second is the “Service Key”, an arbitrary value that will be used by your chrome books to identify themselves to your KeyServer. This can be any text string consisting of alphanumeric characters, period (“.”), the dash character (“-“), or the underline character (“_”). For example it can be a GUID that you generate, or the organization name (without spaces, commas, or other troublesome punctuation). In our example here we will use this randomly generate GUID:
4E9CF5A8-C509-4FC6-A79D-2C0ED0264714
The third is the publicly accessible URL for your KeyServer host, for example:
https://keyserver.sample.org
You can use “http://…” instead of https if you would rather use insecure connections. You can always change this URL if and when you need to.
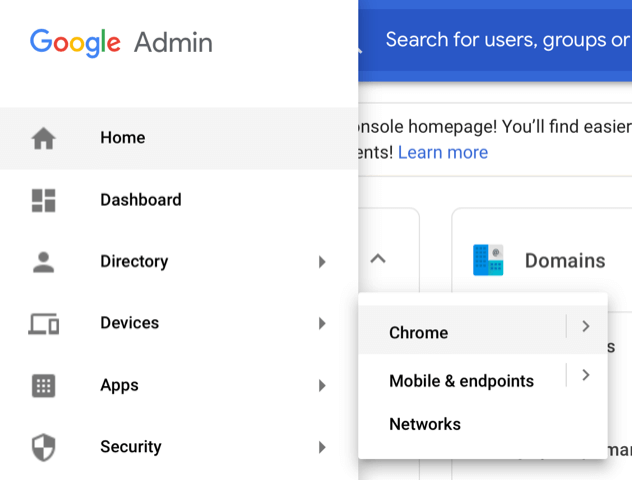
In Google Admin, from the menu choose Devices > Chrome:
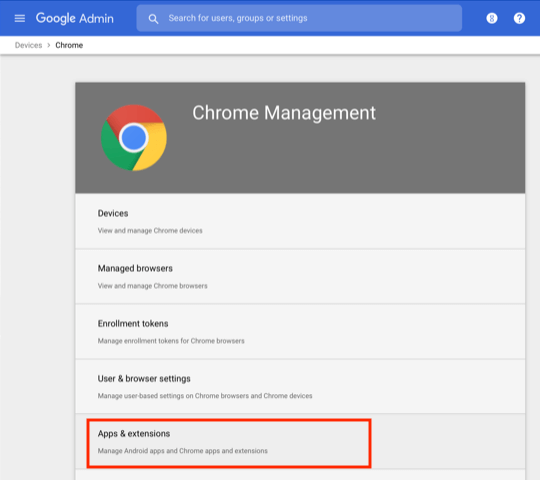
Click Apps & extensions:
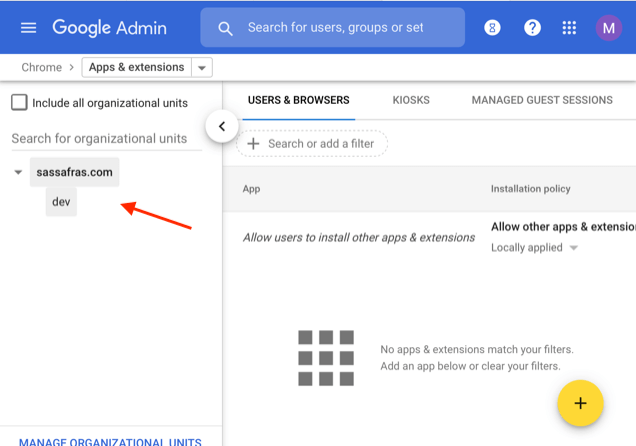
On the left, choose the full org or the organizational unit under which the Chromebook users are managed:
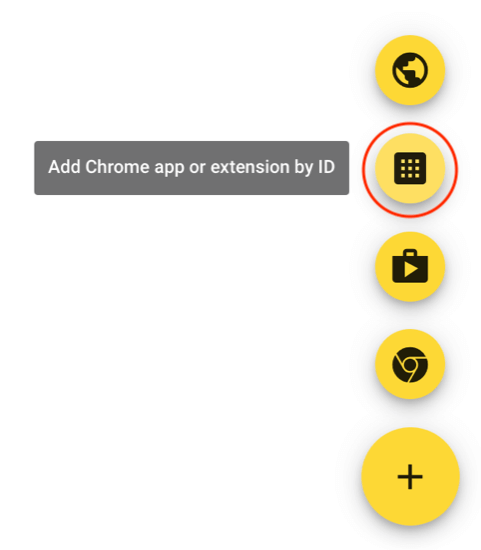
Click the yellow + in the lower right, then click the “Add Chrome app or extension by ID” button:
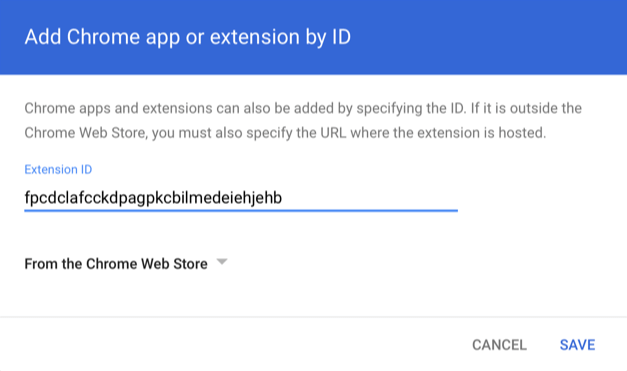
In the prompt, enter the KeyServer Client for Chromebook ID:
fpcdclafcckdpagpkcbilmedeiehjehb
then click Save
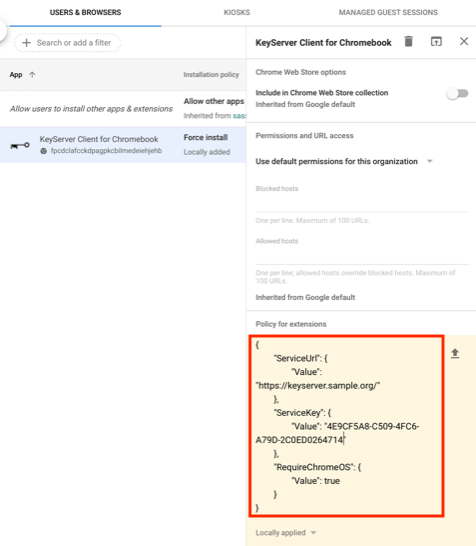
The KeyServer Client for Chromebook extension will be added to the list of extensions. In the properties for the extension, enter the following “JSON” object under “Policy for extensions”. Note that the URL and Service Key have been set tot he values we determined at the beginning of this setup.
{
	"ServiceUrl": {
		"Value": "https://keyserver.sample.org/"
	},
	"ServiceKey": {
		"Value": "4E9CF5A8-C509-4FC6-A79D-2C0ED0264714"
	},
	"RequireChromeOS": {
		"Value": true
	},
	"RequireSerial": {
	"Value": true
	}
}
It is critical that the JSON object is formatted correctly. Double quotes (and not “curly” quotes) must surround all the text, and { } must be used as shown above and in the screenshot below.
Click “SAVE” at the top of the page to save your changes.
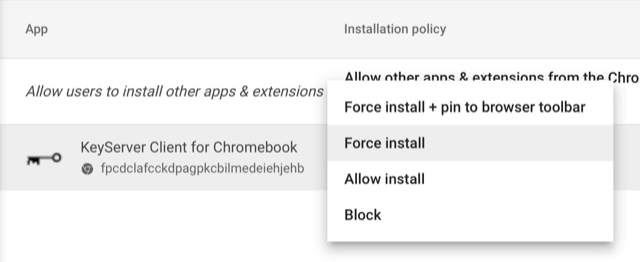
Now in the list of extensions, set this extensions installation policy to “Allow install” or to “Force install” as you see fit. For testing a few devices you might want to use “Allow install”, then on those test devices you will need to choose this extension to install it. Once you are ready to deploy the extension to other Chromebooks, choose “Force install” so that the extension is automatically installed without user intervention. Be sure to click “SAVE” whenever you make changes to this setting.
Now if everything is set up properly, and your KeyServer is at the specified URL, log into a managed Chromebook and after a few minutes the device should appear in the Computer list on your KeyServer. To ensure the extension has been added to the client, check the Extensions:
If you're not seeing the extension get installed, check your settings in the Google Management console. Ensure you are forcing the install, and that it is being applied to applicable groups and/or units if you have a complex structure. Once you verify the extension is enabled, also ensure you log out and back in to the ChromeOS device to see a new login on the computer record in KeyServer.
The client will send various device properties to the server. To get all possible properties, make sure the device is enrolled in Google's Enterprise device management within your Google Admin account.