TN 7194: Jira Integration
Sassafras AllSight can create asset entries in Jira which can then be linked to Tickets
Overview
The Atlassian Jira platform can utilize a number of data sources for asset discovery. Sassafras AllSight offers one such option by way of our free Application available in the Atlassian Marketplace. This document details the steps required to configure this integration.
How it Works
First, a script is installed and configured within AllSight. This script is given a valid Jira token and will then insert data to Jira on a schedule. Note that this integration requires AllSight - it will not work in LabSight or KeySight.

Next, an application for Jira is installed, which enables the data to be viewed and integrated in the Jira UI.

Configuration
- Go to the page for our app on the Atlassian Marketplace, Sassafras AllSight Assets for Jira (or search the Atlassian Marketplace for “Sassafras”, which should show exactly one result for our app). Click on “Get it now”. Next in your Jira instance, click the “Apps” menu and click “Manage your apps”. Wait for the page to populate, then click to expand the section for our app. Finally, click the “Configure” button. On the configuration page, there is one field to fill in - the “Host” of your AllSight server. Type just the DNS name, e.g. allsight.myorg.org. This option allows a link to the computer page within AllSight. Click “Save”
- Generate an Atlassian API token as described here. Copy the token and save it somewhere since you cannot retrive it from Atlassian again once you close the dialog.
- In the AllSight web UI, navigate to Settings -> Scripts. Find “Export Computers to Jira” and click the checkbox next to it to install the script.

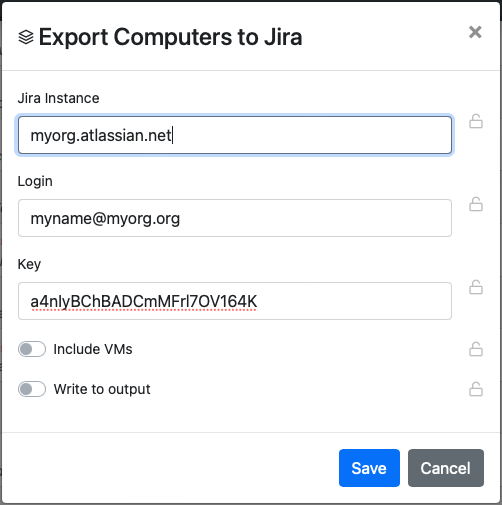
- Click the Gear that appears to the right of the script name and enter the address of your Jira instance, your login (likely an email) and the key you generated in step 2. Decide whether to create entries for VMs. The “Write to output” option can be used to diagnose configuration issues and does not need to be turned on. The options will look something like the first screenshot on this page.
- If you want to schedule this script to run for example every night, click the clock icon next to the script and choose how often to run.
- To do an initial test, navigate to the Computers page in the web UI. Optionally select just a few computers for the first test, or allow it to export all. Click the three vertical dots icon in the upper right and select the “Export Computers to Jira” option.
- Within Jira, click the “Apps” menu and click “AllSight Assets” near the top underneath “Your Apps”. You should see a sortable and filterable list of all computers exported from AllSight. The “Issues” column indicates how many issues are linked to each computer - initially this will be blank. The orange Sassafras icon in the right hand column is a link to the computer page in the AllSight UI, so if you have credentials to login to AllSight, you can see all details for that computer and run reports.
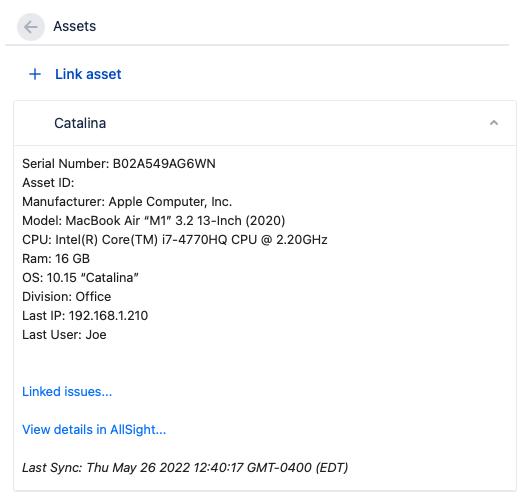
- Within an issue, find the “Linked assets” field and click on “Link asset”. You will be able to type a computer name to search for a computer and link it to the issue. Once it is linked the name will be shown in this field, and clicking the chevron will expand an area that shows details for that computer, as in the second screenshot on this page. The “Linked issues” link initiates a search for any other issues linked to the same computer. “View details in AllSight” will take you to the corresponding computer page in the AllSight UI. “Last Sync” indicates the time when data was last synced from AllSight.
As always please contact support if you need assistance, or have any feedback on how to make this integration even more useful.