Devices Window
The Devices Window displays selected records from the Devices Table. The devices table contains a record for every device added to KeyServer manually, or programmatically by the KeyAccess agent or optional PaperCut integration. In addition to the obvious fields necessary to identify distinct devices, numerous secondary attributes are available for display by using the customizable columns feature. Prior to 7.8 this was simply the Printers window, and printers are now a Category of Devices.

Devices List
The Devices Window is very similar to the Computers window in that it holds a list of assets with various details that can be tagged and added to Divisions. It has fewer fields however because unlike computers, devices do not have an active agent. They also do not consume server license seats. The large right hand pane of the Printers Window contains the list of Devices. As with all list windows in KeyConfigure you can choose which columns you'd like to display with the most useful info for your situation. Simply right click anywhere in the header row of the printer list and choose Arrange Columns. The list of devices shown depends on the display options selected in the left hand set of panes. Double click a Device to get its Details Window and edit the various attributes. To add a device right click in the empty space and choose New Device. You can also import by CSV as detailed below.
Display Pane
The left hand Display pane of the Devices Window has a list of Categories, Divisions, Filters and Tags in expandable items. Clicking to the left of any item here will check that item as an applied display filter to the Devices list on the Right. Multiple checks within a pane are interpreted as an or (Categories and Divisions), while between categories is an and (use a filter or tag in addition to a Category). With a large fleet of devices, this would allow quick filtering of very specific groups of records. Double clicking a given item will open a new window that contains only the devices that match that one criteria.
It is important to note that while Devices have their own list of Tags and Filters, Divisions are shared with and controlled by the Computers Window. The Divisions are shown in the Devices window so you can easily drag and drop devices into them, and you can use them to filter the device list, and double click them to show a new window with only the member devices. However, you can not make new Divisions or edit divisions in the Devices window, those operations must be performed in the Computers window.
As with other windows, you can create tags by adding them to an individual device. Once created, you can drag other devices into that tag. We also have Optional scripts on our website for managing tags that you may find useful.
Importing
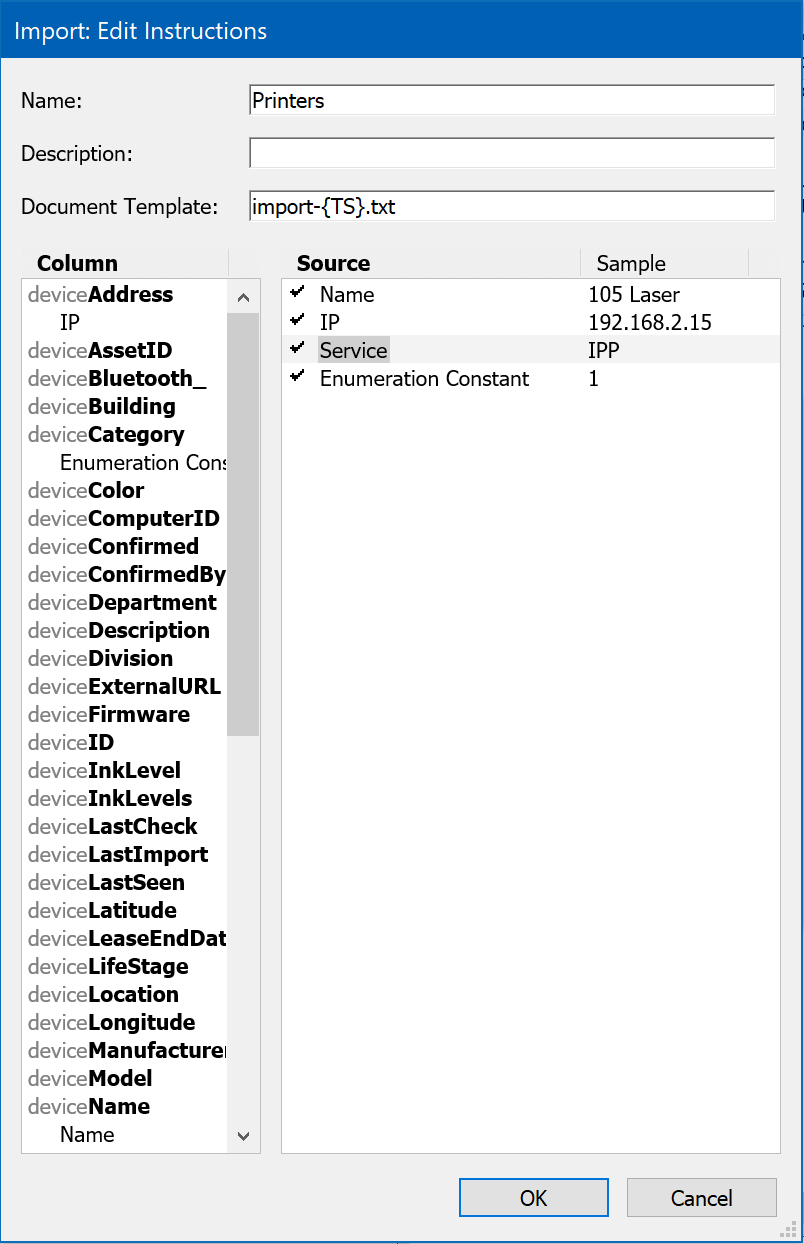
Much like the Computers window, you can import Devices into KeyConfigure by simply dragging in a CSV file. The data you need to import depends on how you'll be using the features. It is recommended you have a Name and Serial if possible to ensure clear and unique identification of the Devices. Records will be synchronized/ updated based upon the Serial as the unique identifier. For Printers, the Service Type is important. If you use IPP the server will query the device at the given IP and attempt to gather details and status. If you use PaperCut, you should look at our documentation for that integration. See the Tables documentation for additional fields, better seen in the Details window.
Example CSV files might be as simple as these:
name,ip,service
testprinter,192.168.1.80,IPP
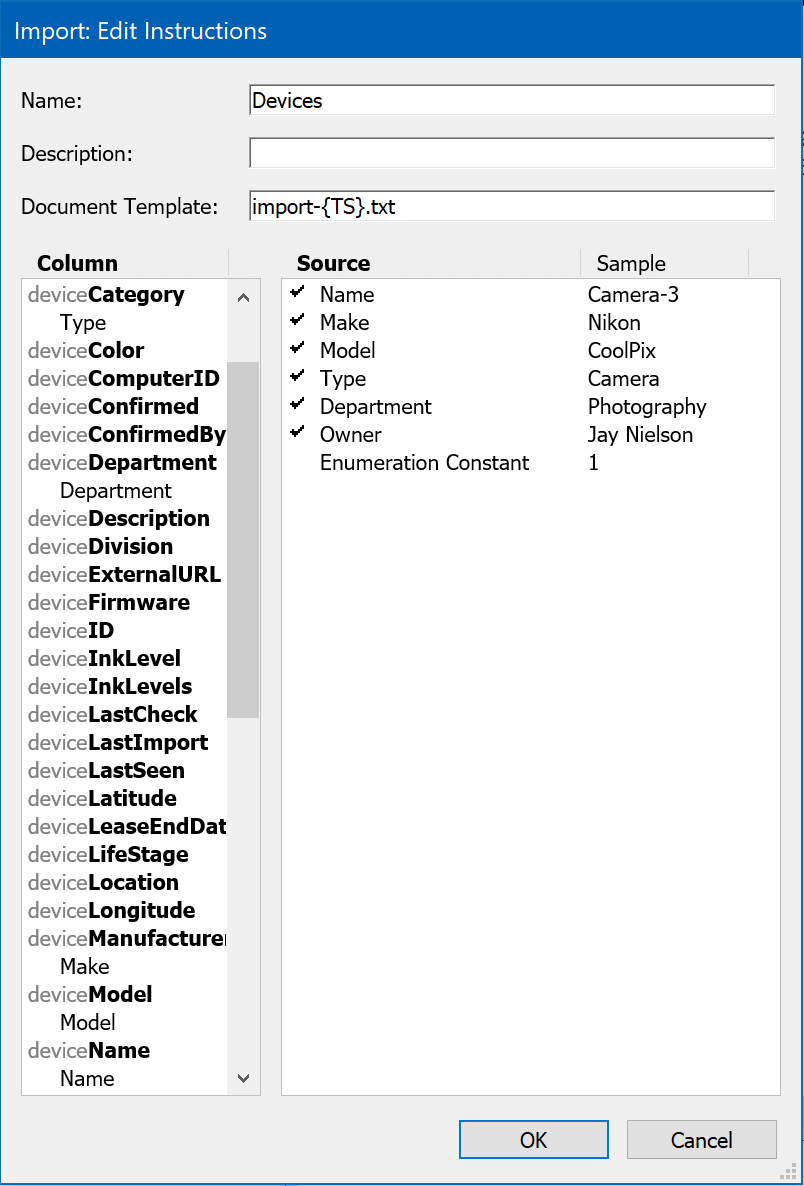
Name,Make,Model,Type,Department,Owner
Camera-3,Nikon,CoolPix,Camera,Photography,Jay Nielson
When you drag a file into the Devices window it will pop up the Import Instructions dialogue.

Click New to make a new import set. You'll then have another window where you can Name the set for later use, and drag your Source fields under the appropriate Columns. Once you have things lined up as needed, save the set.


You'll be returned to the import instructions window. Make sure your new set is selected and click OK.

If there are no ambiguous values, the final screen will show a confirmation of the import mapping, and assuming everything looks right you can click Complete to import all records, or Next to step through them. At any point you can click Stop to abort the import and not bring in the current or further records. Imported records will show as new Devices in the main window, and in a few minutes Printers will be queried by IPP to retrieve other information if you used that option. If you import a lot of Printers, check the Devices Table to see which fields will be replaced by IPP query.
If there are amiguous values, you'll be prompted to clarify them. This will occur with Date fields, and any field where your value does not match one of our preset values. You can also use the "Enumeration Constant" in certain fields to allow you to select a value during the import. You'll be prompted to select a value when confirming the import as in the below screenshot. If you are not prompted for certain columns be aware it is assuming a backend numeric value for a field, so it is not likely to produce the desired result. You can confirm what value is being used when it shows the record import result before you click Next as shown above.
