Automated Client Deployment
At sites that have a large number of KeyAccess client installs to perform, manually running the client installer on each computer may be impractical. This document references some techniques, tools, and documentation that facilitates large scale deployment. These are overviews and examples, your environment may have specific considerations related to these methods.
If you already have the client deployed and are simply looking to push out updates, please also reference our Client Self Update documentation.
Note: deployment of the KeyAccess client on file servers (for the purpose of auditing only) is covered in the Server Audits document.
Large scale deployment methods
- KeyAccess client components can be installed as part of a cloned image for new computers - consult the Cloning document for important cautions and details.
- a general purpose file deployment tool (e.g. SCCM) can be configured to install or upgrade the KeyAccess client files and settings - consult the complete File List document, the cloning document, and the OS Details appendix for details concerning client components and settings.
- an "Application server" such as WTS (Windows Terminal Server) or WinFrame may be used to serve out the KeyAccess client along with server hosted application programs - consult the OS Details appendix for WTS support information. Note: the "Add/Remove" programs control panel should be used when installing KeyAccess in order to ensure that "Install mode" is enabled.
- the client installer on Windows can be run with command line options - consult the documentation notes below.
- the client installer on either Mac or Windows can be customized with site specific preferences for silent execution when logging onto the network - consult the documentation notes below.
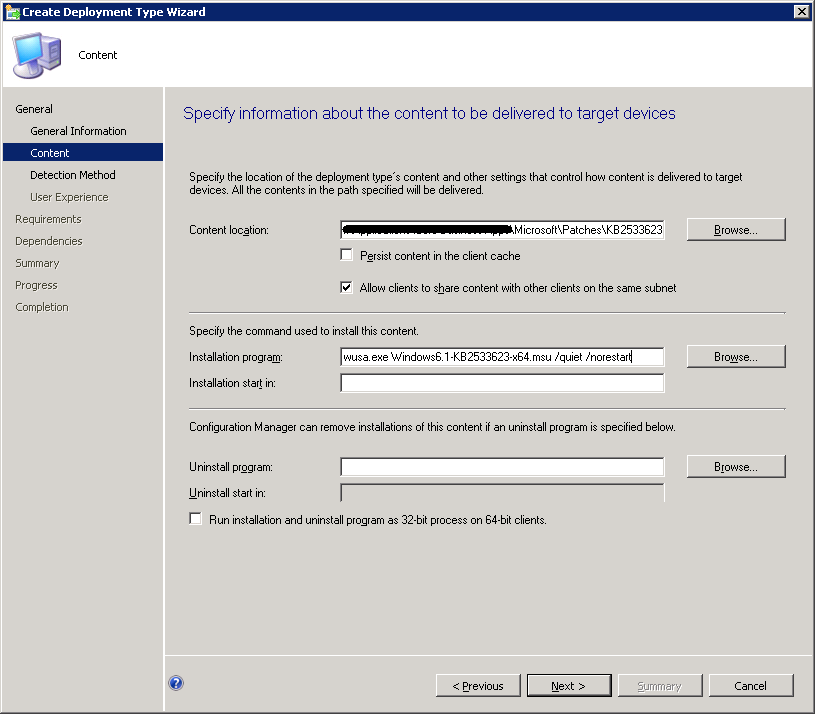
Click here for Information on using SCCM to deploy the client.
Using SCCM to push the client installer should be pretty straight forward. The below screenshot should be similar across various versions of SCCM of the window for a custom package deployment where you can specify the various command line options detailed above. That is, in the Installation program field under Specify the command used to install this content specify something like "ksp-client-x64.exe -q -v PROP_HOSTNAME=keyserver.mysite.org"
Deploy and Update through Active Directory GPO
There are several ways to leverage Group Policy in AD to deploy and update the KeyAccess client. This documentation gives ideas but can not cover all aspects of your potential infrastructure implementation.
One method is to use a startup or shutdown script that calls installers with necessary command line options, e.g.:
\\server\share\ksp-client-x64.exe -gpo -q -v PROP_HOSTNAME=keyserver.mysite.orgThe command line options above will be the most common for an initial deployment, details on the parameters are below. It is assumed you to have a network share that is machine accessible that is used for other GPO deployments.
Triggering on startup or login for a script may not be optimal however, so another method is using a scheduled task.
Click here for a walkthrough of making a Scheduled Task GPO.
- In Group Policy Management create a GPO on the OU you want to deploy KeyAccess to.
- Edit the GPO and navigate to Computer Configuration -> Preferences -> Control Panel Settings -> Scheduled Tasks
- Create a new Immediate Task "(at least Windows 7)" if you want this to be a one off deployment. You can use Scheduled Task if you want to set up say a weekly job where it will check for and install a new client version. And of course you can do both in one policy to cover deploy and upkeep.
- On the General Tab of the task Properties:
- Set a desired name for the Task (seen on client system in Task Scheduler). This is really only significant if you'll be setting up a regular schedule.
- Set the task to run as NT AUTHORITY\SYSTEM by clicking "Change User or Group", typing SYSTEM, Check Name, Choose SYSTEM.
- Set to Run whether user is logged on or not
- Check Run with highest privileges
- Set Configure for to Windows 7, Windows Server 2008R2
- On the Actions tab create a new Action:
- Set Action to Start a program
- Set Program/script to the full network path to the client installer on your share, e.g. \\server\share\ksp-client-x64.exe
- In Add arguments put in -q -gpo -v PROP_HOSTNAME=serveraddress where serveraddress is the FQDN or IP of your KeyServer. You can also add -v PROP_FORCEHOST=1 if you are changing your server address (migrating) and -v PROP_AUDITNOW=1 if you want to force existing clients to do a fresh audit on install.
- On the Common tab, if you make this an Immediate Task, check the box to "Apply once and do not reapply". This makes it a truly one time only action.
Deploy through PowerShell
If you have an environment configured to allow remote PowerShell administration, you could also use that to send an install command. An example could be something like this:
Get-ADComputer -Filter * -SearchBase "OU=myOU,DC=mydomain,DC=tld" | foreach {

    Invoke-Command -ComputerName $_.DNSHostname -ScriptBlock {

        & cmd.exe /c "\\server\share\ksp-client-x64.exe -gpo -q -v PROP_HOSTNAME=keyserver.mysite.org"
    }
}
Please consult Microsoft documentation for requirements on using PowerShell remotely such as Remote Requirements.
Windows Installer command line options
The following command line options are available on Windows (see below for Mac options). There may be others for specific needs rather than general use - if you need something in particular don't hesitate to contact Sassafras Support.
Options to make a quiet install and specify a server address:
-q - do a "quiet" install that won't display any UI, and suppresses restart.
-v PROP_HOSTNAME=keyserver.mysite.org - specify the KeyServer host name or IP address
Options that determine when to install KeyAccess or skip the install, based on versions:
-new - only install if there is no version of KeyAccess installed - do not change an existing install
-upg - install if there is no KeyAccess installed, or if an older version is installed
-gpo - install only if this version is not already installed (install if KeyAccess is not already installed, or if a different version is installed)
You should only specify one of prior first three options (-gpo, -new, -upg). The following table might help understand these options:
| -new | -upg | -gpo | no option | |
| no KeyAccess installed | install | install | install | install |
| older KeyAccess installed | do not install | install | install | install |
| same KeyAccess installed | do not install | do not install | do not install | install |
| newer KeyAccess installed | do not install | do not install | install | install |
Other Options
| -v PROP_AUDITNOW=1 | force an audit to complete immediately after install, even if no user is logged in |
| -v PROP_CONTROLPANEL=0 | do not install the KeyAccess Control Panel (not recommended) |
| -v PROP_FORCEHOST=1 | if the client already has a KeyServer address, overwrite with the value passed as PROP_HOSTNAME |
| -v PROP_KEYCHECKOUT=1 | install the KeyCheckout utility |
| -v PROP_KEYVERIFY=0 | do not install KeyVerify (not recommended) |
| -v PROP_REBOOT=0 | do not reboot after install |
| -v PROP_LAUNCH=1 | launch KeyAccess after install (default) |
| -v PROP_QUITALL=1 | quit all instances of KeyAccess before install (default) |
| -v PROP_LOCKED=1 | do not allow changes to the KeyServer host inside the KeyAccess Control Panel |
| -v PROP_SITE=value | populate a value on the client which will appear in the Department field of the computer record |
| -v PROP_SHORTCUTS=0 | do not create Start Menu shortcuts |
| -v ARPSYSTEMCOMPONENT=1 | hide from Add/Remove Programs |
| -v PROP_TRUST={0|1|2|10} | set the Trust level |
| -v PROP_SECURITY={0|1|2} | set the Security level |
| -v PROP_USERNAME=[reg] | use the given reg or sys value as the username instead of user e.g.<HKEY_LOCAL_MACHINE\System\CurrentControlSet\Control\ComputerName\ComputerName\ComputerName> or ^%AppStream_UserName^% |
Options that determine what architecture to run on (vs aborting the install):
-platform 32 - only install if the client OS is 32-bit
-platform 64 - only install if the client OS is 64-bit
Our recommendation is to always install the same bitness as the OS. While the 32 bit client will run under a 64 bit OS, it will be limited in functionality for tracking certain obscure applications.
Embedding installer options in exe name
Note that on Windows, all of the above options can be embedded in the file name of the installer, so that you end up with an exe that doesn't require any additional parameters (e.g. could be double-clicked). To do this, add an @ symbol just before .exe. Then in between the @ and the . add any parameters you would otherwise pass to the exe, replacing spaces with + signs. For example, you might name a 64-bit installer:
ksp-client-x64@+-platform+64+-gpo+-v+PROP_HOSTNAME=keyserver.mysite.org.exeNote that for this example we have not included the "-q" parameter. If we imagine a user double-clicking this installer, we don’t want it to silently run without any feedback.
Command Line Functions
Note that once installed, you can also call certain functions from the command line. The most common is sending a GPO or command by other management system to force clients to perform an audit. This is useful if you want clients to report in without waiting for a user to log in to trigger a session and scheduled audit.
keyacc32.exe -auditonly -auditnow
You can also do this on a Mac system with:
sudo killall -USR1 karl
Deploying on Mac OS X
On Mac there are no command line options for package installs, but you can still do a silent (remote) install. This can be done in a terminal or with a script using the following two commands:
defaults write /Library/Preferences/com.sassafras.KeyAccess host keyserver.mysite.org
installer -tgt / -pkg ksp-client.pkg
As with all plist files, the format is xml based. While you can edit the plist manually following the normal syntax, it is recommended that you use defaults write to ensure there are no issues with file locking and to avoid issues with binary format. For deployment, it is best to write the settings before running the client installer. KeyAccess launches immediately on install so it is best to have the needed settings in place at launch time. The settings can be installed afer install as well to make modifications, and you can kill the KeyAccess process to make it reload with the new settings as our launch agent will ensure respawn.
Other settings can be put into the plist with defaults write as well, including properties like site (department), assetLocation and other custom properties, as well as the trust and security Secure settings. To discover the proper syntax of the plist file or key names, you can consult k2clientconfig for Mac for settings and try them out. Modify an installer, run it, then look at the results in the plist file.
./k2clientconfig -h 192.168.1.250 -g yes -c yes -k yes -r yes -s 2 -b nos -v site=Baltimore -v assetOwner=Joe_User -v assetLocation=Marketing -v trust=1 -v security=1 ksp-client.pkg
sudo installer -tgt / -pkg ksp-client.pkg
You can then look at /Library/Preferences/com.sassafras.KeyAccess.plist in the Finder to see the contents and the resulting settings.
You can use tools such as Apple Remote Desktop for deployment, as well as systems like JAMF (click the link for our blog on this).
Customized Client installers
Windows
If you require an MSI based installer, or you want to embed install options in the installer instead of using command line options or file naming as described above, you will use a utility named k2clientconfig.exe. k2clientconfig is a command line utility found in the Installers\Windows Installers\Misc\ folder of the Sassafras image archive — or download the latest version from the Sassafras web site. Note however that using k2clientconfig.exe will remove the digital signature from the installer. For this reason, it is preferable to use command line options to the exe, as described above.
Macintosh
As with Windows, it is not recommend to use the k2clientconfig as it removes the digital signature, but it may be the easiest option to create an exception for this modified package in any security software due to Apple's lack of command line functionality for installers. You can find k2clientconfig in the full image archive, in Installers/Macintosh Installers/Misc. Consult the documentation, k2clientconfig (Mac), for instructions on how to access this utility and how to set up customized installer preferences.
Deploying on Linux on a command line
On Linux the KeyServer address can be specified during install using the env command. The installation syntax varies for different specific OS's - two examples are shown below:
sudo env KA_SERVERHOST=keyserver.mysite.org dpkg -i KeyAccess_version-build_platform.deb
sudo env KA_SERVERHOST=keyserver.mysite.org rpm -U KeyAccess-version-build.platform.rpm
For details about other syntax and additional command line options, refer to the Linux Client Deployment documentation.