II. Quick Install & Tour
Here we begin a basic tour of the various windows and features in KeyConfigure
Click on the word “Refresh” at the bottom of the Computers window. The computer that you verified in step 2 will show up in the computer list. Double-click on the computer name to bring up the Computer Details window where you can see the basic hardware properties for this computer in the Information pane. Hover the cursor over each hardware property (over the value, not the label) to reveal any further details that may be available. Try this on the MAC Address. In the Audit pane of the Details window you will probably see that the "Last Audit" time has not been filled in yet. Close the window for now – we will open it up again in 20 minutes or so after the software audit has had time to complete.
The many fields that appear in the Computer Details window can also be included as column headers in the Computers window itself – select "Customize Columns" while right-clicking in the header. The find dialog and Filters can make use of any of these fields in order to quickly locate specific records even when managing tens of thousands of computers.
6. Referenced Products

In the Products window, click in front of 'Unreferenced' and 'Ignored' so that only 'Referenced' has a check mark – this will restrict the view to products that are referenced by either a Purchase or a Policy.
The KeyVerify product is initially the only referenced product. You can see in the windows for Purchases and Policies that the installer has created both a "synthetic" Purchase record and a management Policy for this one product.
Note that as you go through this tour, especially if you stop and return the next day, the KeyAccess client will have returned an audit of your computer, and KeyServer will have checked in with our Product Recognition Service. The result will be a lot more products in the system, and wizards popping up that walk you through the update of Product definitions, and the quick creation of Policies to observer application use. See more on Policies below, and the links given here for more details on these windows and operation beyond the quick tour.
Double-click on the KeyVerify product record to bring up the window, "Product Details for KeyVerify". The Programs pane shows that KeyVerify is actually a "cross platform product" that includes Application program variants for Windows, Macintosh, and Linux. In step 2b, you launched one of these program variants on the platform where KeyAccess was installed.
Note in the Policies pane, the reference to the product from the "KeyVerify Policy" is listed. Likewise, if you expose the Purchases pane (click on the green icon, top right), the reference to the product from the Synthetic Purchase record is listed. Both of these references were created as part of the initial KeyServer installation.
Regardless of which platform you are testing on, we say that the product named KeyVerify was used when the KeyVerify program was launched. This distinction between a Product and the Program variants that comprise it can be confusing, especially when the Product and its Programs are all named the same as in this example.
Although it is program files which are discovered by a software audit, it is the associated Product that is actually purchased and it is the Product which must be managed according to certain license terms and conditions. When a Product consists of a single Program file on a single platform, the overhead of wrapping just this one item in a Product definition may seem cumbersome but more generally, products consist of multiple components that are purchased together and must be managed as a unit. When considering entitlement and license management our focus is always on Products – that is why the Programs window (available from the Windows menu) is not included in the standard view.
With KeyVerify still running from step 2b (launch it again if necessary), look at the KeyVerify record in the main Policies window – on a small screen, push the column divider to the left so you can see the Policy name column. Note that the Policies window shows 1 KeyVerify Policy 'In Use' out of a possible 'Limit' of 2 . Double-click on this policy to see the Policy Details. The 'Scope & Action' pane shows that the policy is configured with a 'Manage' action that is defined by a Concurrent license Metric set to a maximum of 2 concurrent users. The Information pane, like the columns of the main Policies windows, again shows that one out of two concurrent licenses is in use.
Policies are at the heart of configuring active management for software license compliance. The sample policy for KeyVerify is an example that enforces a concurrent use limit. Later in this tour, we will set up a 'node lock' or 'per device' license as an example of another type of policy commonly specified by the license agreement that accompanies a software purchase.
Before we change the default configuration created by the new install, let's take a look at the Purchases window. You will see the "synthetic" purchase record that entitles a concurrent use license for the KeyVerify product. This matches the management policy we just looked at.
Complementing management Policies, verification of license compliance depends on a well maintained Purchase history. This is where license entitlements (including original purchases, upgrades, subscription licenses, etc.) are recorded for each product and each license type (e.g. concurrent use, per device, etc.). This information forms the basis for calculating a "current entitlement position" which can then be balanced against the relevant management Policies.
First close up all of the various detail windows and select “Standard View” in the Window menu. Go to the Purchases window and double-click in the on the purchase record for KeyVerify. In the KeyVerify Details window, the Rights & Conditions pane is where the detailed licensing information is displayed:
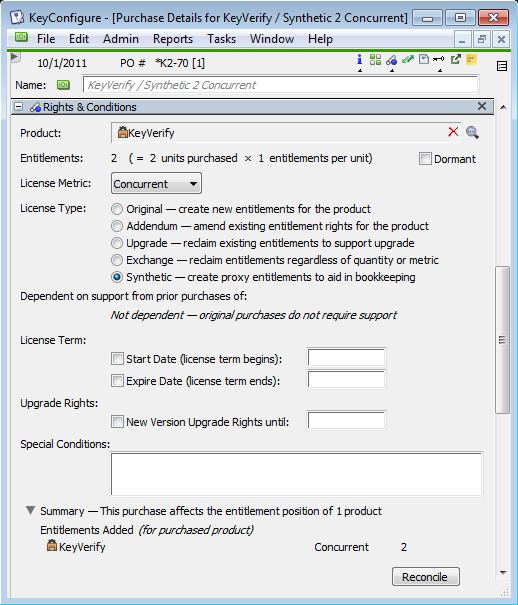
Click on the Summary line at the bottom to expose an explanation of how this single purchase affects the "bottom line" entitlement position for the product. Then click the Reconcile button. A window similar to the one shown below will be opened, but in the left column, the purchase (green icon) may be selected instead of the product (brown icon). Click to select the product, KeyVerify (brown icon), as illustrated below. Note that the Entitled column and Managed column both have the value 2 – the entitlement position and management position are in balance, as further explained on the right
You can explore the reconcile window somewhat further by trying out various selectors on the left. Choosing the Site license Metric in the pull down will simply show that there are no relevant purchases or policies for this license type – and there are no Sections or Cost Centers to explore yet either. Until we have added more data to Purchases and Policies, the power of the reconcile wizard cannot be fully demonstrated but you may already have a sense of its potential.
Reporting is essential both for understanding license compliance and for understanding the actual software licensing needs of your user community. The Reports menu provides an extensive set of built in reports that generate both summary and detailed views of usage and deployment information. For some IT asset management purposes, merely auditing, without observing or managing, may be sufficient for an audit-only compliance strategy. By convention, our standard audit reports display information only about "interesting" programs. A program is deemed interesting if it is mentioned as a component in a Product record. Many common products from publishers such as Microsoft and Adobe will be added to the Products window as soon as a computer has completed an audit – additional products can be added with the New Product... wizard.
Again at this point in the tour, there isn't much data to look at but perhaps the software audit has completed and been uploaded from KeyAccess by now, so let's take a look:
10. Reports
From the Reports menu, in the Audit category select the "Audit Products (PROD x comp)" report. Then click "Run" in the Report Builder dialog. If the audit has completed, you will see the program KeyVerify and perhaps also some other products from the Products window that are installed on the client computer. Any products beyond KeyVerify are courtesy of the Product Recognition Service (PRS). After the client software sent details about all executables found on disk, KeyServer and PRS used these details to automatically find all relevant products and add them to the Products window. If you were to audit a second client computer, PRS would run again and might find additional Products that are relevant now that more Programs have been discovered at your site. This particular Audit report has two levels by default: PRODUCT/Computer. When you run the report you can also choose to include a third level of detail - the specific programs installed. Use the drop down arrow at the top of the report to regroup by computers first – but with only one client at this point in the tour, the two different "views" of the report won't be very different.
Subsequent steps in this tour will demonstrate how to define other products which have been purchased for your site, which then allows purchase records and management policies to be configured. After defining a product there is no need to re-audit the client computers - the new product will be included in standard Audit reports immediately with detail lines showing where it is installed.
11. Programs window
Close up all the windows and then from the Windows menu, open the Programs window. Click on the double check mark between the columns to toggle inclusion or exclusion of the "Ignored" programs in the display – you can see the list total change at the bottom of the window. If the software audit has completed by this point, you will see all the executable files that have been discovered on your computer as well as programs that are included as a component in some product listed in the Products window.
If you go back to the Reports menu and try the Audit (COMP x prgm) report, you will see that by default it includes just Application programs. However, you can select the report from the menu again to bring up the Report Builder window, then click one of the icons in the top right to display the Options pane. Here you can choose to "Include Utilities and Ignored Programs".
But an important point bears repeating: until a program has been associated with a Product, it cannot be correlated with a purchase or a management policy. The existence of program files on various computer disks is by itself not very enlightening. Until the view is narrowed to focus on products, meaningful information can be obscured by the mass of data.