Report Builder Window
Once you have selected a report from the Reports menu (or by right clicking an object in a window), you will see a window which lets you configure how the report will be run. At the top of the dialog, there is a drop down menu which shows the report you have selected. If you selected the wrong report by mistake, you could change your mind and choose a different one from this menu. See also the Report Builder in the Web UI.
While many of the panes described below are shown by default, some are hidden, or are only available for certain reports. The display of any pane can be turned on or off by clicking its icon in the row in the top right of the Report Builder window. Displayed panes have a triangle under them.
Execution pane

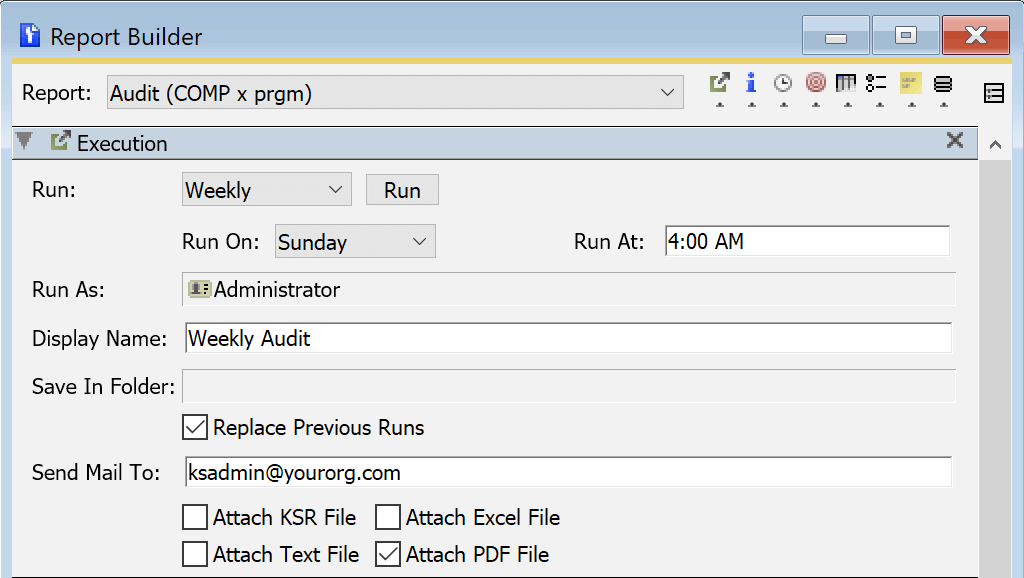
The Execution pane controls when the report will run, and if it will be saved as a template.
Run:
The default in the drop-down menu is Immediately - and clicking the "Run" button to the right will run the report in KeyConfigure using the options selected in the other panes of the Report Builder. Assuming that KeyReporter is turned on (check the Web Service Settings in the Config Menu), a "Save in Folder:" option will be included in the dialog as illustrated above. Then from the Windows menu, open the Reports window so you can specify a save location by selecting a folder name and dragging it into dialog shown above. Saved reports can be accessed later in either KeyReporter or KeyConfigure.
The next choice is On Demand, which allows you to configure a template which can then be used to quickly run a report with a specified set of options at any point in the future. If you select On Demand, you will Save the Report Builder window after choosing appropriate options. Then you will see the On Demand report listed in the Reports window of KeyConfigure, and in the Saved Reports of KeyReporter. From there, the report can be generated whenever you need.
The remaining options are for Scheduled reports, such as Daily or Weekly. KeyReporter must be turned on in order to create Scheduled reports. Once a Schedule is saved, KeyReporter will run the report according to the schedule, and as reports are generated they will become available in the Reports window of KeyConfigure and KeyReporter.
Run As:
Because you can set up complex permissions in KeyServer via ACLs, the main Admin or another enterprise level Admin may want to set up a report for another lesser Admin that will respect the ACLs of Computers, Policies, and so forth. In this case, setting the scheduled report to run as that specific Admin or Role could be useful.
Display Name:
Because you may have several reports of the same type that you save as templates, or even as you explore the past run reports, you can set a display name for the report to help tell it apart from others. For example, instead of 3 Hardware reports, you'd have Hardware-Lab1, Hardware Faculty, etc.
Save In Folder:
In order to save the report as a template to be run later on demand or on a schedule, you'll want to specify which report folder to save the template in. Open the Reports window from the Window menu. You can then drag and drop any folder from this window into the Save in Folder field in the Report Builder window.
If you do not specify a folder, it will be saved to Uncategorized. Each Administrator (authenticated user) of KeyServer can see their own Uncategorized Reports, but not those of any other Admin (with the exception of the root Administrator who can see everything). Access to the other Folders can be controlled by ACLs on each individual folder (by right click -> Edit ACL). Saved Reports and be moved between folders at will.

Dashboard is the default folder that KeyReporter saves all reports generated by widgets and maps (as those are generated with no builder steps).
It may be a good practice to make a new Folder called Shared with open permissions to all Admins for shared reports in a location that is not a system default as outlined above.
From a housekeeping standpoint it's worth noting that any completed reports in Quick and Dashboard are purged after 2 weeks as they are considered outdated and will be freshly generated when needed. Completed reports in a custom folder or Uncategorized won't be automatically cleaned up.
Send Mail To: Here you can specify one or more addresses to email the report to (separate with comma or semicolon). This is most useful for sending an alert that a new version of a scheduled report is available. The email will contain a link to the completed report to be viewed in the Web UI. Note that this requires proper access to view the folder the report is stored in (public or authenticated access). Briefly, if you create a new report Folder in the Reports window it will have view access for the Guest view, so using that as the Save location will allow any email recipient to access the emailed link as long as Guest is enabled in the Web UI. You can also have the report attached to the email in a number of formats. Note that Text can often be more useful in Excel than Excel format due to data formatting, depending if you want readability or raw data for manipulation.
Date Range pane

For any reports involving Usage data, this is the most basic option. Some reports are not “time-based”, so it would not make sense to select a certain interval of time, and the items in this area will be greyed out. For Usage reports you must choose what dates you want to include in the report. You can choose the default Entire Data Set, but more often you will want to choose a specific date range. Generally speaking, the shorter an interval you select, the faster a report will run. Preset choices include:
- Entire Data Set - the report will use the entire range of data which is present in the usage database, whatever it happens to be.
- This Year - the report will use data starting on the first day of the year, and continuing until the present time.
- This Quarter - the report will use data starting on the first day of the current quarter (January 1, April 1, July 1, or October 1), and continuing until the present time.
- This Month - the report will use data starting on the first day of the current month, and continuing until the present time.
- This Week - the report will use data starting at 12 AM in the morning on the previous Sunday and continuing until the present time.
- Today - the report will use data starting at 12 AM this morning and continuing until the present time.
- Last Year - the report will use data starting on the first day of last year, and ending on the last day of last year.
- Last Quarter - the report will use data starting on the first day of the last quarter and ending on the last day of last quarter.
- Last Month - the report will use data starting on the first day of the last month, and continuing until the last day of last month.
- Last Week - the report will use data starting at 12 AM in the morning of two Sundays ago, and ending at 12 AM in the morning on the previous Sunday.
- Yesterday - the report will use data starting at 12 AM yesterday morning and ending at 12AM this morning.
- Custom - this will enable the two text areas below the menu, marked From and To, which will let you type in specific dates and times. The From field will automatically be filled in with the earliest time which is found in the usage database. The To field initially contains now - therefore if you do not change either parameter, this is equivalent to selecting Entire Data Set.
Target pane

If you simply selected a report from the main reports menu, this pane will initially be empty. However, if you right-clicked one or more objects and selected the report from the context menu, you will see those objects listed here. Likewise, if you right-clicked a filter and selected the report from the context menu, you will see the filter displayed here. You may also drag objects from one of the main windows into the list in this pane, including Computers, Divisions, Filters, Tags, Policies, and Groups. You can add tags here as well, and they will be applied to the main object type of the report. Note that only tags that are of the same type as the report primary type are valid. For example, for Usage (COMP x prod) only Computer tags are valid, not Product tags.
If an object type is supported by the report, it will have an icon and a purple background, as illustrated above. If an object type is not supported, it will appear as a Tag, which has no icon and a blue background. While this means actual defined tags and impromptu tags will appear the same, such an impromptu tag will have no impact on the report results. This is because that tag doesn't actually exist in the system. Be aware of this as you set targets if your report results are not as expected.
The “Aggregated” checkbox is useful in two cases. First, if all of the items in the Target box are of the same main item type (not filters or tags), then all data will be combined into a single entry with the name “*” in the report results, as opposed to being individual line items. Second, if you have added only tags to the target area, the results will be combined according to the values of the tags (see the documentation for Valued Tags). If you have specified a filter, the Aggregated checkbox will have no effect.
Time Sets

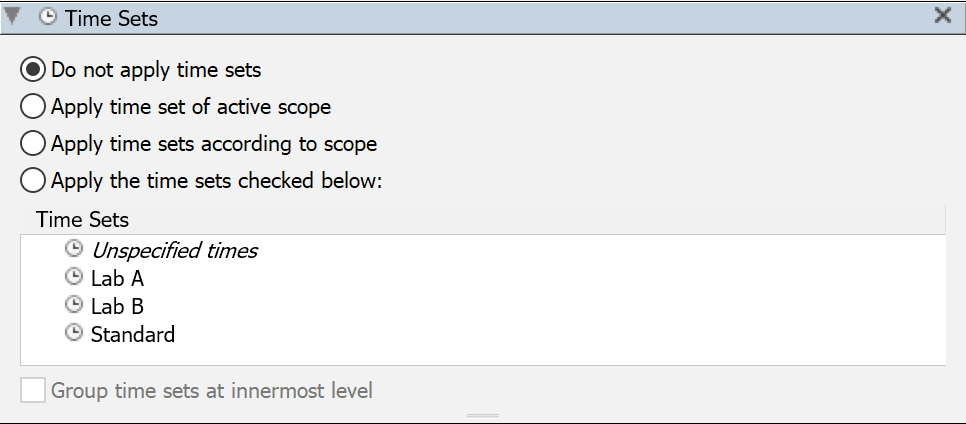
If you have defined Time Sets, you can apply them to most usage based reports. They will either become the top-level groups or the innermost detail, depending on whether you check the “Group time sets at innermost level” option. Suppose you have defined a “Working hours” time set that includes 9-5 Monday through Friday. One way you might use this is to check just this time set, and do not check the checkbox. Then you will see the same report results as usual except that only usage within that time set will be included. On the other hand, suppose you also select “Unspecified times”, and you DO group at innermost level. Then you will get the same report as usual, except that you will see an additional level of detail that will allow you to compare usage during Working hours to usage outside of working hours (“Unspecified times”).
Apply time set of active scope is used exclusively for templates (saved reports) run in the Web UI. It is presented in the KeyConfigure UI as an option for making reports to be run in the web interface, but has no meaning when the template is run in KeyConfigure.
Apply time sets according to scope can be a complex option to consider. Anything you set explicitly as a Target, or that is an implicit target, comprises the scope of the report. For example, Divisions may have Time Sets associated with them by default (i.e. for setting open hours for Availability). If you know there are time sets in place for the "targets", using this option will auto apply the applicable time sets. For example, a Division based Usage report using this option, regardless of narrowing by explicit Target to only a couple Divisions, will apply their linked Time Sets to their individual result calculations. You can always choose to apply no time sets or different time sets with the other options which then ignores these linked "availability" time sets. This option will be disabled if it does not apply to the report type.
Data Source pane

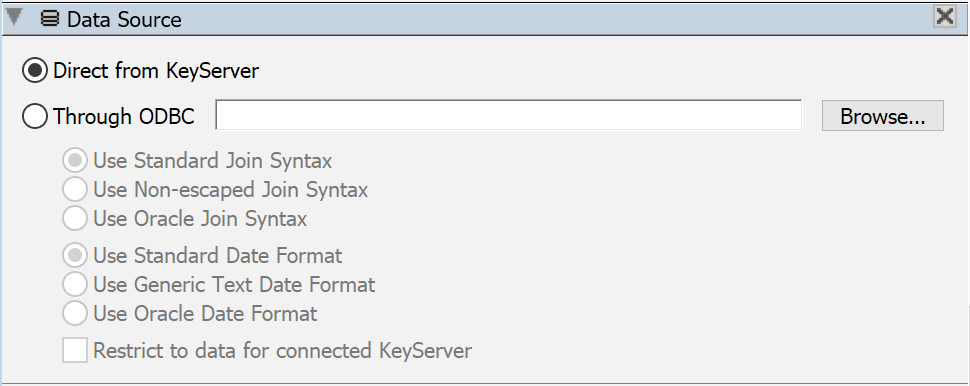
KeyConfigure also gives you the ability to run the internal reports against an external datasource using an appropriate ODBC driver (installed on the KeyConfigure host -Windows or Macintosh) for the target external SQL server. You might want to use this feature if you have a very large site with a lot of usage data. With a huge data set exported to a powerful external database server, queries may perform more quickly than when these queries are targeted to the KeyServer itself.
Please note that this option is remembered between reports! Once you choose a DSN, all internal reports (at least those run from KeyConfigure on this computer) will use this DSN until you subsequently specify internal data and run a report. The Data Source pane contains two radio buttons - Direct from KeyServer, which configures internal reports to use internal data, and Through ODBC, which configures internal reports to use the DSN which you specify. If you select Through ODBC, you must select a DSN which is present on the computer which is running KeyConfigure. Either type the name (if you are sure you know it), or click the Browse button, which will bring up the system interface for selecting a data source. The chosen data source should of course point to the target database which KeyServer exports to.
Note that even if you are using an external data source for KeyConfigure's internal reports, you will still be able to double click on line items in the reports and jump immediately to the corresponding computer and program detail records in KeyConfigure - the KeyConfigure report behavior is exactly the same regardless of whether the report is querying exported data or KeyServer's internal databases.
Columns pane

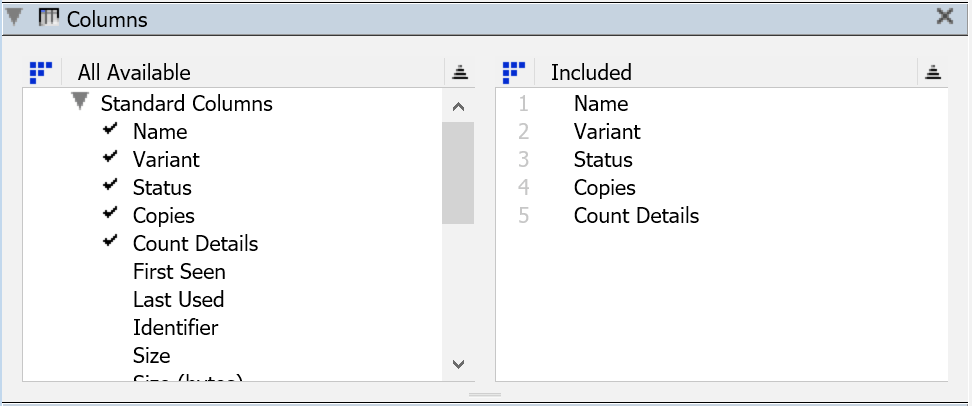
Use the Columns pane to specify the fields that will be displayed in the report, typically chosen from the listing of "Standard Columns". Many reports join information from 2 data tables so you can also select from the listing of Group Columns or Detail Columns to display additional columns at the appropriate level, Summary or Detail.
Drag and drop items between Available and Included to add or remove their display from the report, and what order they appear in.
Options pane

When certain reports are selected (e.g. the Audit (PRGM x comp) report), there may also be an Options pane available, where additional options can be specified which affect the report output.
Notes pane
The Notes Pane allows you to save notes in reports. These notes will be copied into completed reports when they are run from the On Demand or Scheduled reports.
Report Descriptions
For a full description of each report, see Reports.
For managing reports see Reports Window.
For easy access via the web see KeyReporter Reports.