Purchase Details
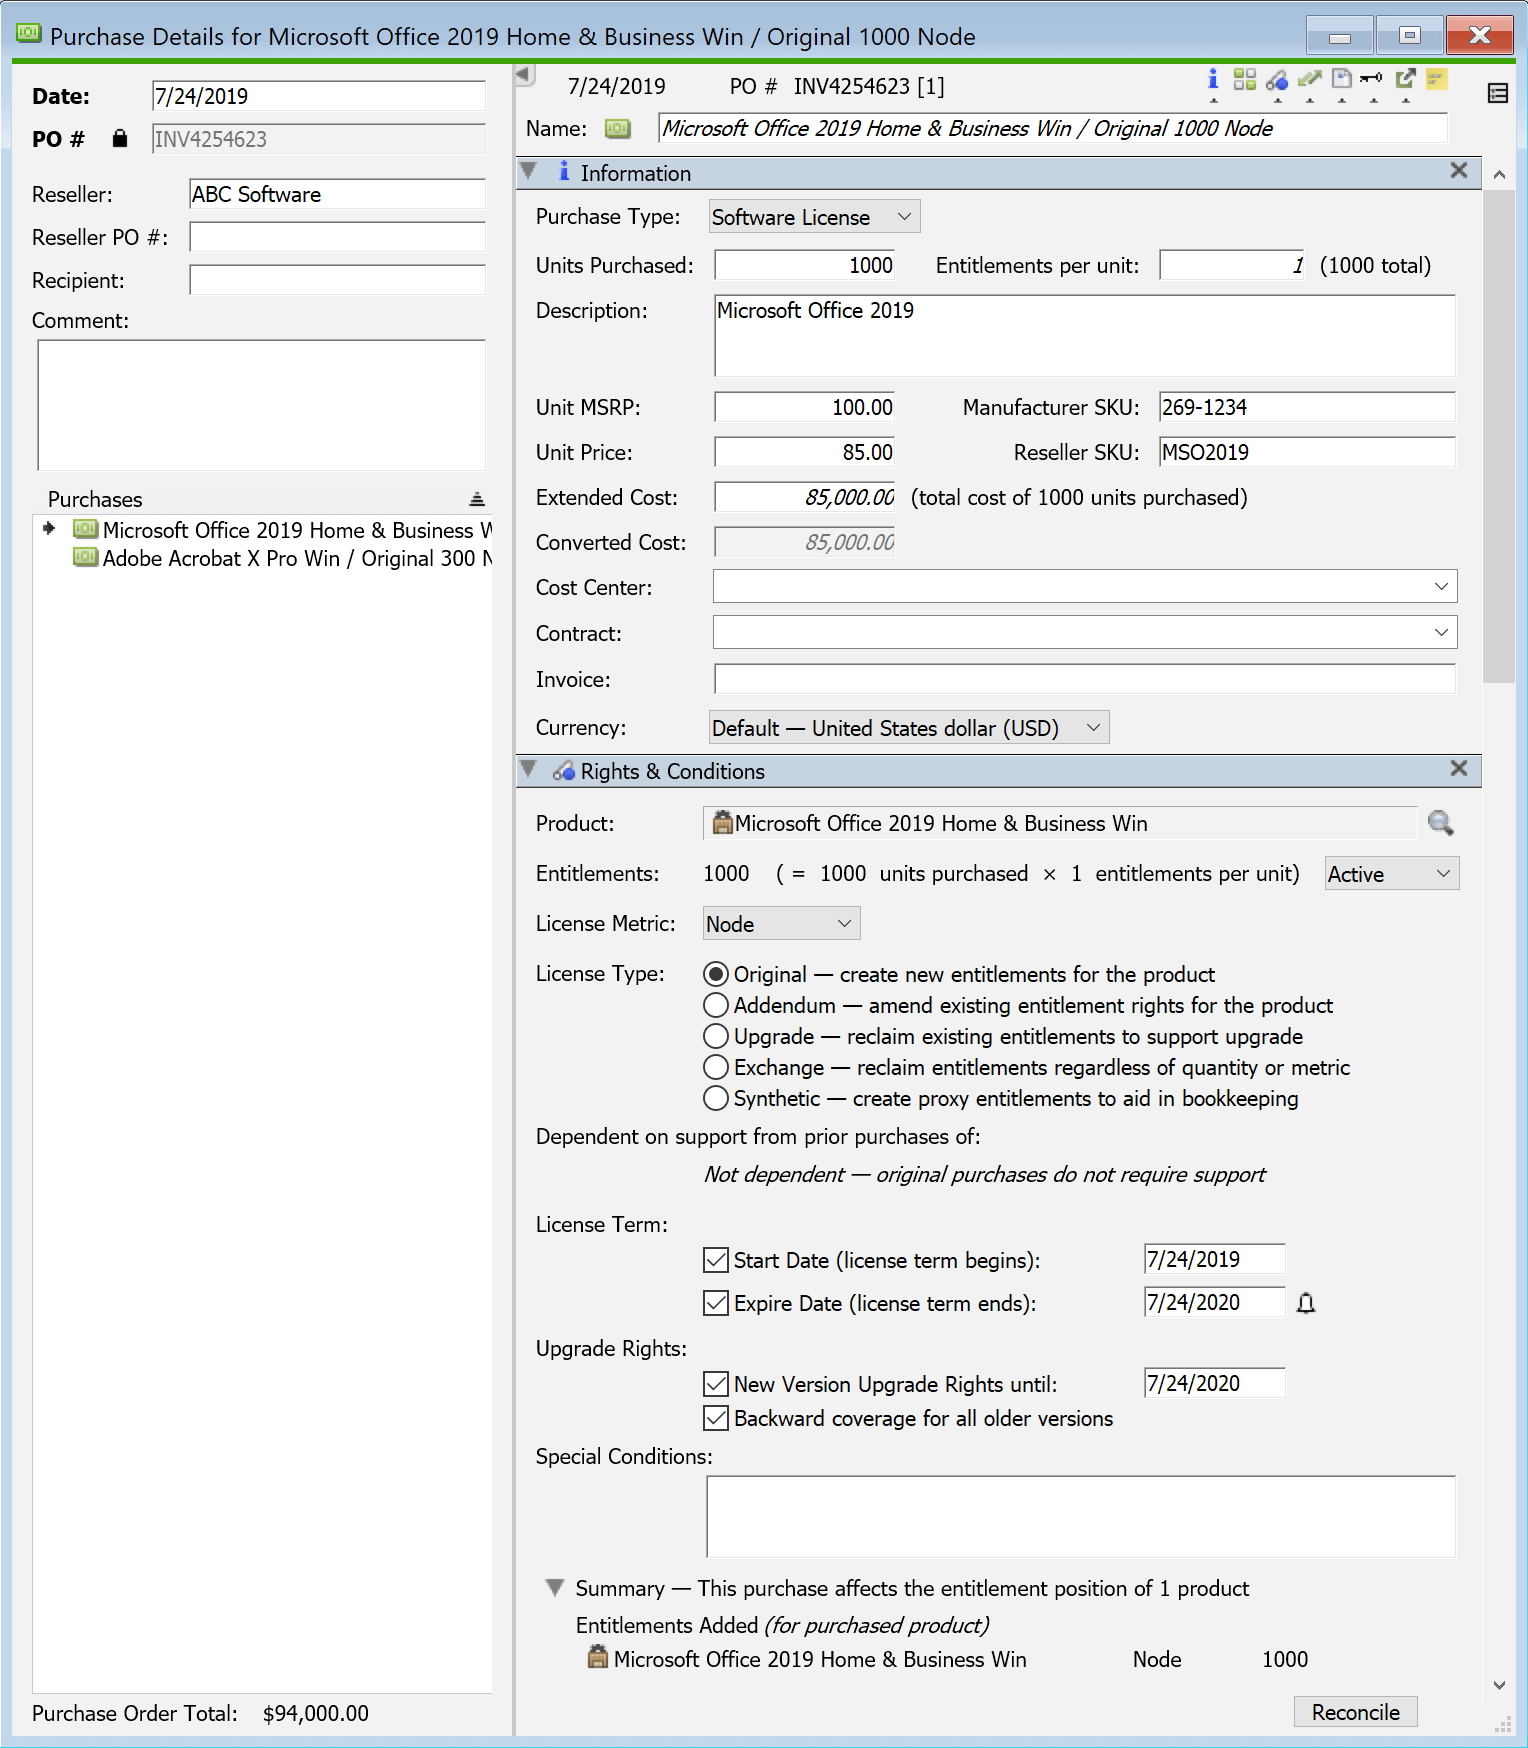
Each Purchase Details window displays all the fields of a purchase record along with pointers to related records. Starting from the main Purchases window, select a Purchase record and double click to bring up the corresponding Purchase Details window where all fields can be seen and edited. New Purchase records are created using the Purchase Wizard rather than by direct data entry in a Purchase Details window, but edits and additional data entry can always be done in the details window itself.
![]() This icon in the upper left controls the left column of the Purchase Details window – click to expose or hide. The left column displays the required fields, PO number and PO date, along with a listing of other purchases (if any) made on the same purchase order. To create an additional purchase under this same PO number, right-click in the Purchases list area and use the “New Purchase...” menu item.
This icon in the upper left controls the left column of the Purchase Details window – click to expose or hide. The left column displays the required fields, PO number and PO date, along with a listing of other purchases (if any) made on the same purchase order. To create an additional purchase under this same PO number, right-click in the Purchases list area and use the “New Purchase...” menu item.
The selection arrow ![]() in the Purchases pane on the left marks the particular Purchase item under the displayed PO# whose details are currently displayed on the right. You can add a new purchase to an existing PO by right clicking in the Purchases pane. Using the Purchase Wizard does not allow a PO collision, so this is the method for entering sub purchases under a shared PO.
in the Purchases pane on the left marks the particular Purchase item under the displayed PO# whose details are currently displayed on the right. You can add a new purchase to an existing PO by right clicking in the Purchases pane. Using the Purchase Wizard does not allow a PO collision, so this is the method for entering sub purchases under a shared PO.
A lock icon next to the PO # field allows the PO # to be changed.

A customizable name field for the selected Purchase appears along with the PO number and date as a heading above the detail panes. These required fields are repeated from the left column so they will remain visible even when the left column is hidden. Since our main interest is software, where it is actually a software license that is purchased, the various detail panes are focused on this purchase type. In particular, the “Rights & Conditions” pane is where the specific license terms and conditions are summarized so that management Policies can be reconciled against the specific rights recorded in this pane.
The icons in the upper right toggle on the various sub panes of the Purchase Details window. The triangle/dot under the icons indicates if it's shown or hidden. The icon to the far right will enter single pane mode in which you toggle between each pane and only see one at a time.
Information pane
Fields in the Information pane correspond to a single line item on a typical purchase order – a description of the purchased item, the part number (sku), quantity, pricing, etc.
Purchase Type
The first drop down is for the type of purchase you are entering. Depending on the purchase type, not all of the other fields in the purchase record will be applicable, but they will still be shown. You may use or ignore the various fields as desired as none are technically required. It is only when planning to fully utilize the software asset management features that you will want to ensure full details are entered. The following options are available:
Units and Entitlements are a fine detail of a software purchase that while not critical to get right, does offer clarity when referencing your license terms. For example, you may buy a lab pack (1 unit) that is good for 30 seats (30 entitlements) as opposed to a single or multiple box copies (1+ units) good for one installation (1 entitlement each).
Description is a free form text field where you may enter more information about the purchase that is not covered by the other fields. This can be distinct from relevant notes outside the purchased item itself that you may want to enter in the Notes pane (see below).
The various fields for costs and prices should be reasonably straight forward. Note that Unit Price x Units Purchased = Extended Cost, so be careful to enter data accurately to avoid incorrect math results. Note the Converted Cost field will convert the Extended Cost from the Currency specified in this detail to the Default Currency set in Config -> General Settings -> Misc. This will be done with ECB data relative to the purchase Date. If using the Default Currency the Converted Cost field will be locked, but can be manually edited if needed when using any other currency (or none).
The Cost Center and Contract fields can be useful as a way to segregate both Purchase and Policy data into well defined subsets so they can be independently reconciled. As a convenience, whenever you type in a new value it will be added to a drop down list for subsequent use both in Purchase and Policy records.
Rights & Conditions pane
The Rights & Conditions pane lets you efficiently summarize the important “rights and conditions” commonly found in software license agreements. Many options will not be shown if the Purchase Type is not Software, and the option are less significant in those cases. All fields are optional, but often beneficial.
It is important to enter complete and accurate licensing information for each software purchase since this data forms the basis for calculating the “current entitlement position” of each specific product version paired with each license metric. This calculation depends on detailed data for each purchase including license rights, license metric, upgrade rights, and expiration dates along with dependencies, if any, on prior purchases. When the complex historical chain of multiple upgrades, exchanges, purchases, expirations, etc. is accurately represented (including specification of the correct license metric), then the aggregated “current entitlement position” will form a reliable basis for establishing license compliance and for reconciliation against license management Policies.
Note that if this information is properly completed in the purchase, when a Policy is made from the Purchase all license metrics are brought into the Policy automatically. If you manually connect a Purchase with a Policy, it is important to ensure these metrics match or results can be unexpected. The details of a given license need to be obtained from the provider, Sassafras Software can only advise on use, not provide details of your other vendor contracts.
Product
Product must be set to the proper Product for the Purchase. You can do this in several ways, like drag and drop from the Products Window. During the new purchase wizard you will be prompted for a product and can use the search to find the right one. Right clicking a Product to initiate the new purchase will auto select it. The Product is the center of the chain between purchase and Policy that allows reports to show reconciliation and other ROI features. In some cases you will want to choose an Edition product (version), and in others you will choose the Family (all versions). This will typically center around the license terms and if it will use Upgrade or Addendum purchases over time (see below).
Purchase items can be marked as Active, Legacy, or Dormant. Active purchases contribute to the overall entitlement position as calculated in the Reconcile process. Dormant purchases are not considered during the reconcile process. Between these two choices are Legacy purchases. Legacy purchases will not be counted toward any potential “Savings” in the Compliance report and related widgets. Otherwise Legacy purchases are like Active purchases, and count toward the entitlement position. An example of this is old software you still own and may still be in limited use, but is not being upgraded and widely used anymore. If you own 30 seats of such a product and only 5 are used, that's fine because you're not renewing it anymore, so to avoid the reports and widgets from showing a 25 seat overspend you mark the Purchase as Legacy.
In the case of a purchase that crosses Products due to Platform, this can be set up on the Policy end. You can link the purchase to say the Windows version of the product, and then have both that product and the Macintosh version in a Policy. Because they are in the same policy, if the Windows version is the Primary (bold) all usage of the Mac version will also be counted toward the Purchase when running Reports.
License Type
The relation of License Type is also important when linking Products. An Upgrade is for a purchase that gives rights to a new version. That is, you own version 3 perpetually, and must purchase the upgrade to version 4. You would then also choose the Dependent product and purchase in the below fields. Alternately, Addendum would be the proper choice for an annual maintenance contract that entitles you to the current shipping version of the product at any point during that yearly cycle.
Expanding the triangle next to the Summary at the bottom of this pane shows the incremental effect on Entitlements that this specific purchase has. For example, an Upgrade will subtract 5 from the Entitlements for an earlier version of a product while adding 5 to the Entitlements available for the newer version. While the information in the Summary area only takes this one purchase into consideration, clicking the Reconcile button will open a window showing summarized Entitlement information for all purchases of this product along with a summarization of currently configured policies. For more, see the Reconcile Window documentation.
An important footnote is you must have a complete chain in KeyServer for Purchase history for everything to evaluate properly. A specific pitfall is putting in a purchase as an Addendum without putting in the Original. If you do not put in the Original, then you should classify the "renewal" as original rather than addendum to avoid a deficit being calculated. Alternately, you can create a Synthetic original. This is a symbolic original to signify you do not have the original record but assert a start point from which you can Upgrade or add Addendums.
License Term
If there are start and end dates to the purchase entitlement you should enter them in the License Term and Upgrade Rights sections. These are not only important for book keeping but for alerting. Widgets in the Web UI can display upcoming expirations. Email Alerts can be sent based on the expiration dates approaching. These mechanisms help ensure you do not have software expire and cease working due to oversight.
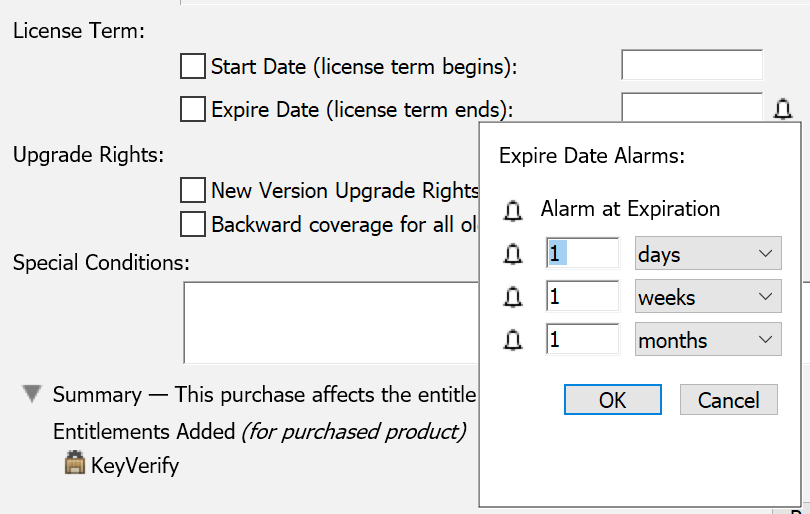
Note the bell icon next to the License Term: Expire Date field. Clicking this shows a popup where you can set 3 levels of Alerts which set when the alarm is logged in the Admin Alerts window. These display at login to KeyConfigure and show in the status emails if those have been configured. By default at the system level these alerts are 1 day, 1 week, 1 month, but any given purchase can be modified to a different reminder schedule. The reminder emails can be sent to a specific address per purchase using the email field in the External pane below.

Categorization Pane

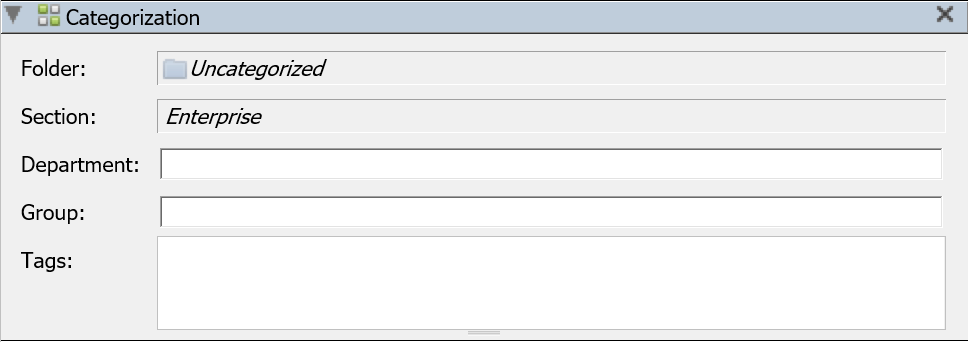
This pane shows the Purchase Folder which this Purchase has been assigned to. Next it shows the Section for this Purchase. Sections can be dragged from the Computers Window into this field. The Section is used during Product Reconciliation. The Department and Group which can be used however you wish - KeyConfigure and KeyServer do not assign any particular meaning to these fields. Which is to say, Group has no correlation to the Groups window in any way, and dragging such an item to this field only adds text, not an object reference (no icon). Lastly there is the Tags field which you can use to further organize purchases much like tagging Computers.
Dependencies Pane

This pane is used to display and edit the allocations which are made between purchases. Original purchases do not require support from other purchases, but certain types of purchases such as Upgrades do require support in order to be activated. Addendum, Upgrade, and Exchange purchases all require support, so in Purchase Details for these types, the Dependencies pane has a list of Support, showing what prior purchases give support to this purchase. For an Original purchase or a Synthetic Purchase, no Support is required, so the first list is hidden. All purchase types will show a list of Assignments which lists where the entitlements originally granted by this purchase have been Assigned to (though often this list may be empty). A purchase may be dragged into the Assignments list of another purchase. Clicking a purchase listed in the Assignments list allows the count for that assignment to be changed. Right-clicking a purchase in the Assignments list allows it to be Deleted. All of these adjustments to the Dependencies are much lower level than is usually interesting. For the most part the Reconcile Window will automate the task of allocating Assignments in a much more understandable interface.
Documents Pane

The Documents pane provides storage for copies of the license contract, invoice, and other entitlement documentation. This pane is used to associate files or URLs with a purchase. Files will be stored on the KeyServer computer, but may be opened from within KeyConfigure at any time. In order to add a file, drag it from Explorer (win) or Finder (mac) into the list in this pane. When you save the purchase details, the new file will be uploaded to the KeyServer for storage. Any file listed in this pane may be double-clicked to open the file on the KeyConfigure computer using whatever application the OS is configured to use for the relevant file type. Documents can be used to store proof of purchase or license agreements.
Install Codes Pane

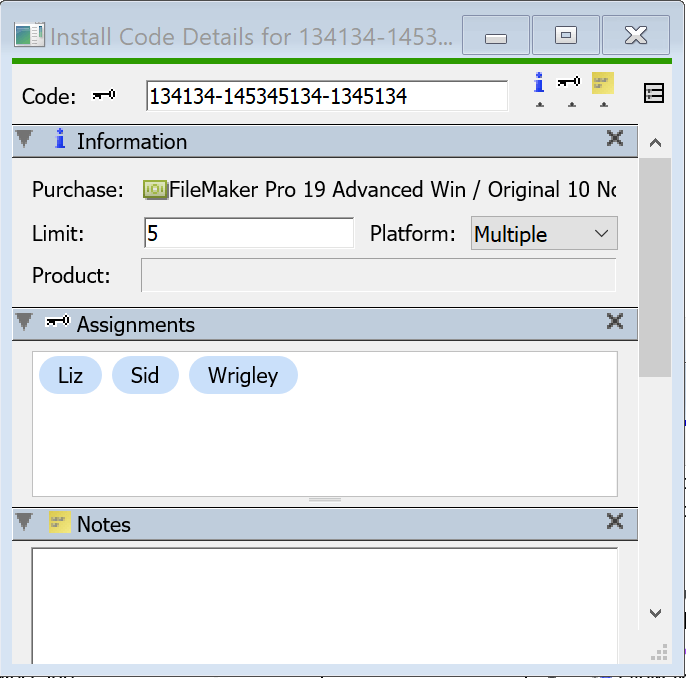
This pane allows you to enter any Install Codes which accompany a purchase. Right click in the pane to create a new code, or double click on an existing code, which will open the Install Code Details window.
The Name of the code is intended to be the actual code you input to install the software. However, some sites find it useful to use this as a department name, especially if there are no individual codes. In this way, a purchase for 25 seats could be segmented by sets of codes into a pool of 5, 10, and 10, and the allocations for each pool seen separately.

By using the Maximum field in conjunction with the Assignments field it will automatically show the Limit and Count in the main pane of the purchase details. You can drag a Product into this details pane which can differ from the Product in the Rights & Conditions pane if needed. This could be helpful to break out edition codes under a family product for example. You can also drag Computers or Users into the Assignments pane to denote where the code has been installed. Doing so will allow you to see the link in the Install Codes pane of those detail windows. Lastly there is even a Notes pane (independant of the Notes of the purchase details) which can be used to comment the history of code allocations, or list the actual install code if Name is being used for a department for example.
External Pane

This pane contains text fields which can largely be used however you want. One possible use for the External ID field is for linking to data in a different system. This could be useful if you have a separate financial/purchasing system. The E-mail field however will set who receives the reminder alerts set above for the expiration date.
Custom Pane

You can create up to 10 Custom Fields for Purchases. Once a field has been defined it can be used like any other field in the record.
Notes Pane
A field for any additional arbitrary notes you want to add to the purchase record. For example, a chain of approval the purchase went through.